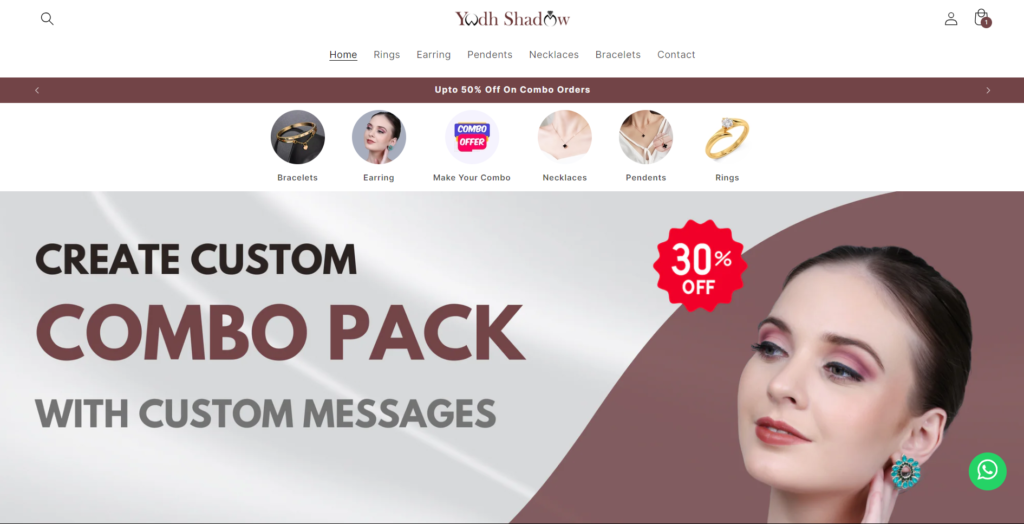
How To Add Collection In Circular Carousel Slider Shopify? In This Post, We will Learn How To Add a Collection In the Circular Carousel Slider Shopify. There is no Coding knowledge required for this you just have to follow the steps and you can add a circular collection to your Shopify store and it’s free.

Step 1: Get into Shopify Admin
Sign in to your Shopify admin account.
On the Dashboard, look for Online Store in the menu on the left.
Select Themes.
Step 2: Change the Code
In the Themes area, spot your current theme and click Actions (it’s next to the theme’s name).
Pick Edit Code from the menu that drops down.
Step 3: Find the Sections Folder
When the code editor opens look for the Sections folder in the sidebar on the left.
Click Sections to open it up.
Step 4: Create a New Section
At the top of the Sections folder, click the Add a new section button.
In the window that pops up, enter a name for your new section (for example, custom-section) and click Create Section.
Step 5: Paste the Code In Your Liquid File Given below
<style>
@media only screen and (max-width: 600px){._circle_img img{width:60px;}
._circle_icon{gap:13px !important;justify-content: flex-start !important;}
  </style>
<div class=" icon_circle_parent icon_circle-{{ section.id }}" style="padding-top:15px; padding-bottom:15px; padding-top: 10px; padding-bottom: 10px;" >
{% if section.settings.is_icon_enable %}
    <style>
      ._circle_icon{display:flex; justify-content: center; align-items: center; gap:40px; flex-wrap: nowrap; overflow: auto;}
      ._circle_img img{border-radius:100%;width:80px;}
      ._circle_img{display: flex; flex-direction: column; justify-content: center; align-items: center;}
      ._collection_title{font-size: 12px; font-weight: 600;}
      </style>
    <div class="_circle_icon page-width">
  {% for block in section.blocks %}
    {% assign _circle_collection = block.settings.circle_collection %}
    {% assign _collections =  collections[_circle_collection] %}
    <div class="_circle_img" >
    <a href="{{_collections.url}}">
    <img src={{ _collections.featured_image | img_url }}>
      </a>
      <span class="_collection_title">
        {% unless block.settings.cutome_title_circle == blank %}
        {{ block.settings.cutome_title_circle }}
          {% else %}
          {{ _collections.title }}
        {% endunless %}
      </span>
    </div>
{% endfor %}
</div>
{% endif %}
</div>
{% schema %}
  {
    "name": "Circle Collection",
    "settings": [
      {
        "type": "text",
        "label": "Title",
        "id": "icon_title"
      },
      {
        "type": "checkbox",
        "label": "Enable Circle Icon",
        "id": "is_icon_enable"
      }
    ]
    ,"blocks": [
     {
       "type": "circle-icon",
       "name": "circle Icon",
       "settings":[
         {
           "type": "collection",
           "label": "Select Collection",
           "id": "circle_collection"
         },
          {
           "type": "text",
           "label": "Custom Collection Name",
           "id": "cutome_title_circle"
         }
       ]

     }
    ],
    "presets": [
      {
        "name": "Circle Collection"
      }
    ]
  }
{% endschema %}
Step 6: Save the Section
Step 7: Add the Section to Your Theme With named Devdesire Circle Collection
For better understanding, you Can watch our YouTube Video Given Below


we get a lot of knowledge from your videos. I’m very Happy You keep making more good videos
thankyou so much sir
we get a lot of knowledge from your videos. I’m very Happy You keep making more good videos
thankyou so much sir