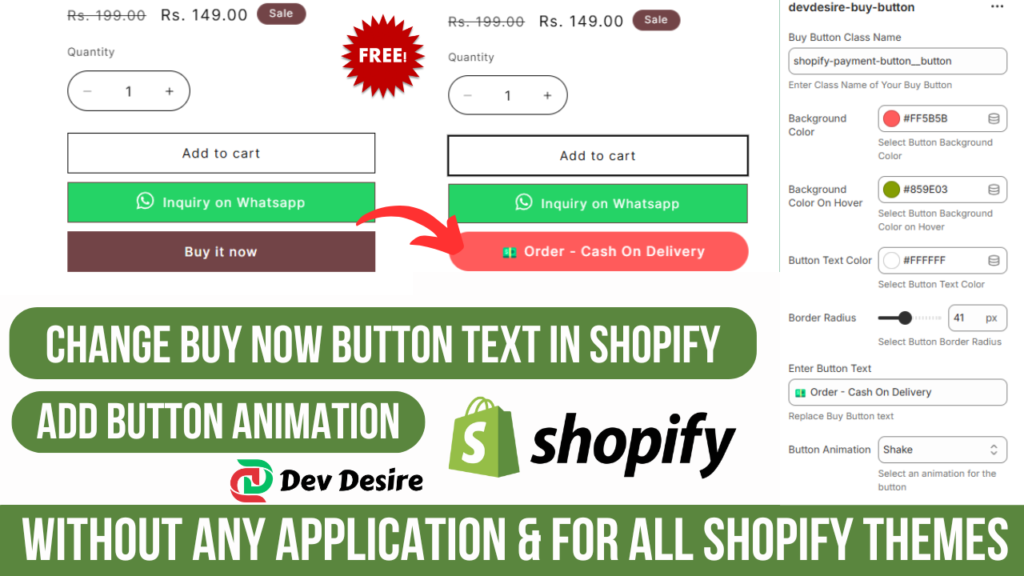
The “Buy Now” button plays a crucial role in guiding customers to make purchases on your Shopify store. Modifying its text can align it better with your brand or specific campaigns. This guide will show you Change Buy Now Button Text in Shopify using custom code and configurations.
Why Change the Buy Now Button Text in Shopify?
Customizing the “Buy Now” button text can help:
- Match your store’s tone and branding.
- Encourage urgency (e.g., “Order Now”).
- Tailor messaging for promotions (e.g., “Claim Your Discount”).
How to Change Buy Now Button Text in Shopify
- How to Increase Shopify Website Speed: A Complete Guide for 2025
- How to Add Dynamic Text on Shopify Product Card and Product Page | Shopify | Devdesire
- How to Create a video Slider in Shopify Free
- How to Change Buy Now Button Text in Shopify
- How to Create an Animated Collection Menu Section in Shopify Free Section
Here’s a step-by-step guide to change the “Buy Now” button text in Shopify.
Step 1: Add the Custom Code
Insert the following code in your Shopify theme:
{% assign class_name = section.settings.class_name %}
{% if section.settings.btn_replaced_text %}
  {% assign new_btn_text = section.settings.btn_replaced_text %}
{% endif %}

<style>
  .{{ class_name }} {
    background: {{ section.settings.btn_color }} !important;
    border-radius: {{ section.settings.btn_border_radius }}px !important;
    color: {{ section.settings.btn_text_color }} !important;
    box-shadow: none !important;
    {% if new_btn_text != blank %}
      font-size: 0px !important;
    {% endif %}
    animation: {{ section.settings.btn_animation }} 1s infinite;
  }

  .{{ class_name }}::after {
    box-shadow: none !important;
    {% if new_btn_text != blank %}
      content: '{{ new_btn_text }}' !important;
      font-size: 16px !important;
      position: unset !important;
    {% else %}
      position: absolute !important;
    {% endif %}
  }

  .{{ class_name }}:hover {
    background: {{ section.settings.btn_color_hover }} !important;
  }

 /* Shake Animation */
@keyframes shake {
  0%, 100% { transform: translateX(0); }
  20%, 60% { transform: translateX(-5px); }
  40%, 80% { transform: translateX(5px); }
}

/* Bounce Animation */
@keyframes bounce {
  0%, 20%, 50%, 80%, 100% { transform: translateY(0); }
  40% { transform: translateY(-10px); }
  60% { transform: translateY(-5px); }
}

/* Pulse Animation */
@keyframes pulse {
  0% { transform: scale(1); }
  50% { transform: scale(1.05); }
  100% { transform: scale(1); }
}

/* Rubber Band Animation */
@keyframes rubberBand {
  0% { transform: scale(1); }
  30% { transform: scaleX(1.25) scaleY(0.75); }
  40% { transform: scaleX(0.75) scaleY(1.25); }
  50% { transform: scaleX(1.15) scaleY(0.85); }
  65% { transform: scaleX(0.95) scaleY(1.05); }
  75% { transform: scaleX(1.05) scaleY(0.95); }
  100% { transform: scale(1); }
}

/* Swing Animation */
@keyframes swing {
  20% { transform: rotate3d(0, 0, 1, 15deg); }
  40% { transform: rotate3d(0, 0, 1, -10deg); }
  60% { transform: rotate3d(0, 0, 1, 5deg); }
  80% { transform: rotate3d(0, 0, 1, -5deg); }
  100% { transform: rotate3d(0, 0, 1, 0deg); }
}

/* Tada Animation */
@keyframes tada {
  0% { transform: scale(1); }
  10%, 20% { transform: scale(0.9) rotate(-3deg); }
  30%, 50%, 70%, 90% { transform: scale(1.1) rotate(3deg); }
  40%, 60%, 80% { transform: scale(1.1) rotate(-3deg); }
  100% { transform: scale(1) rotate(0); }
}

/* Wobble Animation */
@keyframes wobble {
  0% { transform: translateX(0); }
  15% { transform: translateX(-25%) rotate(-5deg); }
  30% { transform: translateX(20%) rotate(3deg); }
  45% { transform: translateX(-15%) rotate(-3deg); }
  60% { transform: translateX(10%) rotate(2deg); }
  75% { transform: translateX(-5%) rotate(-1deg); }
  100% { transform: translateX(0); }
}

/* Jello Animation */
@keyframes jello {
  0% { transform: scale3d(1, 1, 1); }
  30% { transform: scale3d(1.25, 0.75, 1); }
  40% { transform: scale3d(0.75, 1.25, 1); }
  50% { transform: scale3d(1.15, 0.85, 1); }
  65% { transform: scale3d(0.95, 1.05, 1); }
  75% { transform: scale3d(1.05, 0.95, 1); }
  100% { transform: scale3d(1, 1, 1); }
}

/* Heart Beat Animation */
@keyframes heartBeat {
  0% { transform: scale(1); }
  14% { transform: scale(1.3); }
  28% { transform: scale(1); }
  42% { transform: scale(1.3); }
  70% { transform: scale(1); }
}

</style>

{% schema %}
{
  "name": "devdesire-buy-button",
  "settings": [
    {
      "type": "text",
      "id": "class_name",
      "info": "Enter Class Name of Your Buy Button",
      "label": "Buy Button Class Name"
    },
    {
      "type": "color",
      "id": "btn_color",
      "label": "Background Color",
      "info": "Select Button Background Color"
    },
    {
      "type": "color",
      "id": "btn_color_hover",
      "label": "Background Color On Hover",
      "info": "Select Button Background Color on Hover"
    },
    {
      "type": "color",
      "id": "btn_text_color",
      "label": "Button Text Color",
      "info": "Select Button Text Color"
    },
    {
      "type": "range",
      "label": "Border Radius",
      "id": "btn_border_radius",
      "info": "Select Button Border Radius",
      "min": 0,
      "max": 100,
      "default": 0,
      "unit": "px"
    },
    {
      "type": "text",
      "id": "btn_replaced_text",
      "label": "Enter Button Text",
      "info": "Replace Buy Button text"
    },
    {
      "type": "select",
      "id": "btn_animation",
      "label": "Button Animation",
      "info": "Select an animation for the button",
      "options": [
        {
          "value": "",
          "label": "None"
        },
        {
          "value": "shake",
          "label": "Shake"
        },
        {
          "value": "bounce",
          "label": "Bounce"
        },
        {
          "value": "pulse",
          "label": "Pulse"
        },
        {
          "value": "rubberBand",
          "label": "Rubber Band"
        },
        {
          "value": "swing",
          "label": "Swing"
        },
        {
          "value": "tada",
          "label": "Tada"
        },
        {
          "value": "wobble",
          "label": "Wobble"
        },
        {
          "value": "jello",
          "label": "Jello"
        },
        {
          "value": "heartBeat",
          "label": "Heart Beat"
        }
      ]
    }
  ],
  "presets": [
    {
      "name": "Devdesire Buy Button",
      "category": "Header"
    }
  ]
}
{% endschema %}
Step 2: Configure the Button in Shopify Theme Editor
- Navigate to Online Store > Themes.
- Click Customize for your active theme.
- Select the “Devdesire Buy Button” block or similar custom section.
- Update these settings:
- Buy Button Class Name: Assign a unique class for your button (e.g.,
buy-now-btn). - Button Text: Input the desired replacement text, e.g., “Get It Now.”
- Background and Text Colors: Adjust to suit your branding.
- Animation: Choose from effects like “Shake,” “Bounce,” or “Pulse.”
- Buy Button Class Name: Assign a unique class for your button (e.g.,
Customizing Buy Now Button Text for SEO and User Experience
When crafting your button text, consider SEO principles:
- Use action-driven keywords like “Shop Now” or “Buy Today.”
- Match the text to the intent of your target audience.
- Keep it concise and engaging.
Note :- Different Slideshow Images for Mobile and Desktop – Watch Tutorial on Youtube
Key Benefits of Changing the Button Text
- Enhanced User Engagement: Personalized text grabs attention and improves click-through rates.
- Brand Consistency: Aligns the button with your store’s messaging.
- Higher Conversion Rates: Encourages immediate action.
Best Practices for Shopify Button Customization
- Preview Changes: Always test your updated button text on desktop and mobile.
- Optimize Animations: Use subtle effects like “Pulse” to avoid overwhelming users.
- Track Performance: Monitor your store’s analytics to see the impact of button text changes.
By following this guide, you can easily change the “Buy Now” button text in Shopify and tailor it to enhance your store’s performance. Always aim to balance creativity with usability for the best results!
Let us know in the comments if you have any questions or suggestions. 🚀


